
Autocalibration Support Guide
Calibrating a 3D printer can be time-consuming and frustrating. That’s why Allevi introduced autocalibration for Allevi 1’s and Allevi 3’s. Below, we discuss how autocalibration works, important details to keep


Calibrating a 3D printer can be time-consuming and frustrating. That’s why Allevi introduced autocalibration for Allevi 1’s and Allevi 3’s. Below, we discuss how autocalibration works, important details to keep

Several Allevi platforms have multiple extruders which means you can bioprint a multi-material construct. Below, we discuss the process of designing your bioprint to make the most of this feature.

Welcome to the Allevi Bioprint Online user guide! This guide will walk you through the details of each section of the Allevi software. You can also follow the steps in
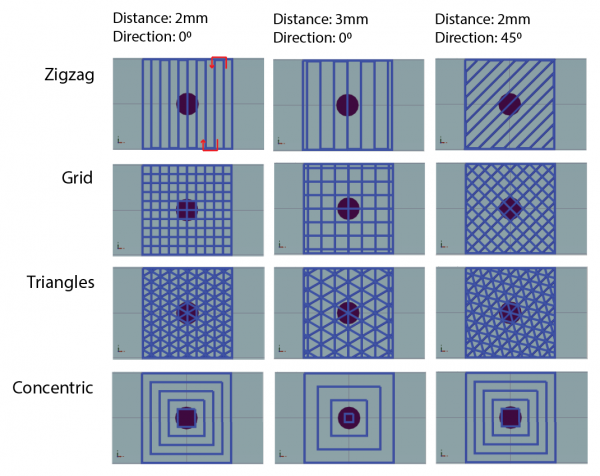
The Allevi Software features a built-in slicer so you can turn your STL files into g-codes for bioprinting. Below, you can find illustrations of the slicer infill patterns currently available.

The pressure you supply to an extruder is one of the most important parameters in pneumatic extrusion bioprinting. As such, you’ll probably want to change your pressure settings a great

Specifications Setting up your bioprinter Carefully remove your bioprinter from the packaging by grasping its frame firmly with both hands. Please retain the original packaging and box in the event
Strong and capable. The Allevi 3 delivers autocalibration, 4-160°C temperature control, and visible/UV photocuring in three independent printheads. Find your bioink of choice and start building. This quickstart guide of
As the intermediate between STL models and a bioprinted model, gcode is a scripting language, or set of instructions, for controlling a 3D printer or bioprinter. Gcode holds a lot
The world’s first desktop 3D bioprinter. The Allevi 2 offers visible or UV light photocuring, room temperature to 160°C heating, and dual extruders. Find your bioink of choice and start


